Search This Blog

Monday, January 7, 2019

My curtain project


These are the black-out insulating curtains I made.  I didn't want to go back with the warm window curtains I had due to cost and complexity of construction.  So I had to come up with a new method.  See below the pictures for instructions.

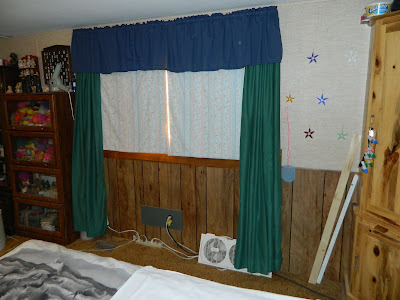
                                  Bedroom window with swamp cooler and air conditioner

Large bedroom window
This curtain opens by moving one panel to the other side, double-hanging both curtains on one side on the l-hooks that hold the curtains up (see below for more details).  If I want to have the entire window uncovered, I toss the curtains on the bed for the day.

This is what the curtain looks like open half-way.  This is the usual situation with this curtain.  It can hang off to either side of the window.


Living room window
These are used only in the summer when it's extremely hot.  Since they are hung on l-hooks, they easy go up and down.  I made a box in which to hang them when they are not on the windows.  In the winter, the box gets covered and the curtains store in the shed.


Spare bedroom

Bathroom 1
This is not like the other curtains,  It is just an insulation panel cut to fit inside the window against the glass and covered with a fabric envelope.  I used snaps to hold the panel inside after closing the top of the envelope and there's a tab to pull it back out of the window when I want it out.

Bathroom 2
This is the same as the larger curtains, only using denim for the covering.


I started with bubble type insulation I bought in a roll from Home Depot.  It's 15 inches wide and I had to sew two panels together for my 29 inch wide windows.  I just hand-sewed it, securing the top and bottom when I started so it wouldn't shift.  I bought the type of insulation with a staple tab, which just meant the inch on each side had flattened bubbles.  I overlapped by an inch for the middle seam, taking advantage of the staple tab to get a flat seam.

You will need to measure your windows and decide how wide and long the curtains need to be.  That's up to you.  Also, the rods will have to be cut to size, with and extra 1/2" or so to keep the curtain on the hooks it hangs on.  Most of this will become obvious as you progress.

I used fabrics I had on hand.  Once you determine your window size, you can calculate the amount of fabric you need.  If you have fabric available, you can make a paper pattern for the size of curtain required and then lay it on the fabric to check and see if you have enough fabric.  Otherwise, you'll have to do some math!  Any lightweight fabric will do.  I used denim on my small bathroom window, but that would be too heavy for these curtains.

I will note that plaid may not be a good choice of pattern.  I had a hard time getting all the seams and casings perfectly straight and it is very noticeable on plaid!

The covers are an envelope into which the insulation slides.  I sewed ribbons into the casing and the side with just the turned over edge so I could secure the envelope together at the top, rather than using a permanent seam that wouldn't allow for easy washing and fabric replacement.  This was probably the slowest part—the ribbons were stubborn about staying pinned in place!

This is the envelope with the insulation pushed inside.  The middle seam goes down the middle of the envelope vertically.  I trimmed any pieces that did not quite fit.  You want a tight fit for a smooth looking curtain, but not bulging or curving.  It needs to lay flat.   The white rods off to the right are what I used to hang the curtains with.  They are 3/16" rod I got from a local recycling business.  I painted them white to give them a nicer look than bar metal.  If your curtains are long, you may need a slightly larger diameter rod.  However, these are very lightweight curtains.

This is the envelope, tied together, with the rod run threw the casing and the silver insulation inside.  The ties keep the envelope "sealed" and allow easy removal of the fabric should you need to wash or replace it.  This makes the curtains very easy to repair or change the colors of the fabric should you want to do so.  That was a problem with the warm window curtains—hard to replace the fabric cover that showed on the inside of the room.  Mine was never replaced.  The fabric also had to be vacuumed rather than being washable like these are.
I did sew small buttons on the corners to hold the insulation in place (see picture below).  I put 3 buttons on the top curtains because I made them longer to overlap the bottom ones, but they are difficult to visually identify as longer.  The extra button makes this easy.  (I will have to cut the buttons off should I replace the cover or the insulation, but that's not a big problem.)

I installed the curtains using l-hooks I purchased at the local hardware store.  The curtains for the taller windows are in two pieces, allowing one to open all or half the window.  The bedroom ones with the air conditioner and swamp cooler have extra hooks that allow the curtain to be hung either above the air conditioner and swamp cooler, or to cover to the bottom of the window in the winter.  If we only want to open the curtain half way, the bottom curtain moves to hang with the top one on the top hooks.  If the full window is opened, I toss the curtains on the bed during the day.  I used longer hooks on top to accommodate the double hanging of curtains.


Because the curtains can slide off the rods, I put rubber bands on the rods to prevent this.  It's optional.  If the casing is tight enough or you don't move the curtains often, they will not be needed.
See the button sewn on to hold the insulation in place?  There's one on each corner and an extra one in the middle on the top curtain.

An additional notes:
These are not as effective as the warm window curtains because they simply hang on a rod and have no magnetic strip holding them tight against the wall.  However, I have had them freeze to the window on cold nights, so they do insulate.  They also block virtually all light.  These are much lighter and easier to deal with than hanging a blanket over the window or other varients on DIY warm window curtains.  As noted, I  do have them freeze to the window due to condensation on the window.  My house has a condensation problem and it stained the warm window curtains on the window side quite badly.  This is why I chose to make covers that can easily be replaced.

That's it.  Should you have any questions, feel free to ask in the comment section.


Friday, June 15, 2018

May/June update

A word about the “fake prairie life".  There are blogs about "prairie life" that include dressing up fancy and pushing products on the net.  THAT IS NOT PRAIRIE LIFE.  That’s downtown Denver life.  Believing this fantasy land can lead people to think moving to the prairie is romantic.  Suddenly, the kid is bitten by a rattlesnake, the dog attacked and killed by an eagle, and the home flooded in a hail storm and electricity is out for two weeks.  Assuming one is still there when winter hits, it's 10 feet of snow and 60 mph winds.  The lie of the prairie romance is exposed.   I find all of this type of “make-believe” harmful to the world, creating a false story that people fall for and can end up dead from.  I realize that fiction is the new “reality”, but I have to mention that reality still exists even if you think you can ignore it.

Speaking of rattlesnakes, I came out of my garage and found this on laying along the path to the house.  I fetched the snake hook, a cooler and the snake is now in the taped shut cooler in the shade to be released after my hubby comes home.  We usually look for an open place to release these, though the wiping out of ranches means there are fewer and fewer places the snake can actually live.  (For those of you who hate rattlesnakes, all I can say is "haunta virus".  You kill the predators that keep the vermin in check, you get more vermin.)

A couple of days later while mowing I went over the top of a baby rattlesnake, about the size of a pencil.  I couldn't catch him and he slithered out of the yard.  About 4 days later we found him again out in the windbreak.  Again, couldn't catch him.  So now I do yard work with leather gloves on!


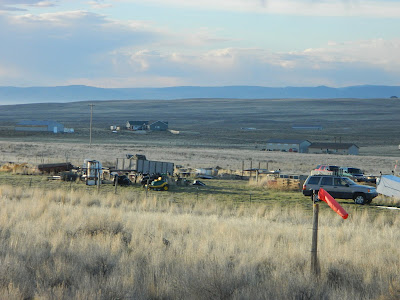
Speaking of vermin, I now live between two rural ghetto junkyards:


These are vermin haven.  The bunnies like it too, but I worry that the number of mice breeding is huge.  The county doesn't care in the least.  You can have 100 dead cars and other junk and nothing is done.  Now, for the lowlifes who want to live in garbage, that's great.  However, I caution you if you want to move to Wyoming that you may be living next to garbage dumps.  

There is an up side to this.  I was going to paint my house all one color and make it look nice.  However, since I live between garbage heaps, I'm sticking with the calico motif and painting the walls, trim and skirting whatever colors I have.  Actually, I kind of like the quirky look and since my neighbors have made it clear that there is no reason to care what your lot and house look like, I plan on going with the idea.  Plus, adding some colorful "garden tool statues" (really recycled tools welded together and called "art"), probably a few other cute artsy things in really hideous colors, etc.  It's quite freeing to live where there are zero standards. 

The good news is the really ugly, rotting trailers up the road (that we drive by daily) are being torn out.  I guess the owner finally sold them and maybe the new owner will actually care about having a decent subdivision.  Maybe….. These are the remaining blights, and the demolition of other trailers.


This one is torn down now


Now, just some pictures.

Kingbird

Pincushion cactus blooming

Prickly pear cactus about to bloom—looks like a face!

Locust tree in bloom

Iris in bloom


Monday, February 5, 2018

Most odd-looking critter

We saw this yesterday, the 4th of February, on the way home:


A mule deer without ears—or without the usual big "mule" ears they are named for.  This one has like teddy bear ears.  Slightly creepy…..

Sunday, November 12, 2017

Mostly pictures and some explanations:

The red sun is from the smoke coming from the West coast forest fires.  Those have pretty much ended now and the sun is back to normal.


The garden did pretty well considering it was cool and wet for May and June, then 90 degrees for all of July.  The peas even managed to hang in there until about the middle of August.  I did use shade covers over them much of July.


The zucchini is odd shaped 
due to growing around the 
stem of the plant.
The tomatoes didn't get a chance to ripen much before frost became common overnight, so I took them inside to ripen.  The cupcake paper cups were my husband's idea.  They keep the tomatoes from touching.  I then made newspaper squares and set individual tomatoes in those to do the same thing.  The tomatoes ripened faster than in the past, and were wonderful eating.  I also froze a lot of them whole for soup and sauces later on.  They're a colorful array of tomatoes!

Next are the two swift foxes we caught in the yard.  One was a young fox, the other full-grown.  They make the loudest growling and barking when you get close to them in the trap!  We just turn them loose.  They are harmless and rather cute except for the snarling!   

Skunks are captured and disposed of, however.  One tried to dig into the garden and go after the ducks.  After twice he/she dug under the gate as far as they could, I put the trap across the gate opening, with the gate closed, and set the trap.  That skunk will not be bothering the ducks again.  

It's funny, when there's a predator like a skunk or an owl, you can tell because the ducks are all huddled together on the far side of the garden.  They stayed far away from the skunk in the trap, even after it was dead.  As long as they could see it, they stayed away.

I had not purchased a gas can in years and discovered they were made useless by government regulation.  I "adjusted" the spout, removing all the impediments to getting gas out.  When I finished (picture is part way through the process), the spout looked normal again and gas flowed freely!

Remodeled gas can spout

The next picture is a window leak, which we now have stopped.

This is the "we have too many ducks" stage!  We ended up butchering 16 total over the summer.  Now, there's just 6 left.  It's time to clip wings again—one was out of the garden this morning!

Pictures from here on:

Peek-a-boo


Yes?


Wolf spider I found in dog's toy box


Something nested on the outhouse at the cabin!

That's it for now!


Tuesday, May 9, 2017

Enjoying nature

Today I was startled by a sparrow trying to build a nest under my window air conditioner.  This is not uncommon.  In the past, they have even built under the cover.


I thought maybe just putting in pictures of the critters around here might be fun.  It's springtime right now, meaning it goes from snowing to 80°F (27°C) about once a week here!  Icicles form from the rain sometimes.

We have a wide variety of critters around:

Deer 


Doe

Yearling


Rabbits:
Tiny bunny


Bunny right outside my door


The tiny bunnies are now about one and half times the size shown in the photo.  These bunnies live under the platform outside my door (seen in the above photo).  I have nearly stepped on them several times.  They have no fear of me.  Nor do the deer.

Grackle

The grackle comes to where I toss bird seed out the window.   There's no feeder, I just toss the seed on the ground.  I have gotten a surprising variety of birds to come in and eat.  April and May are the best time, as the birds are migrating through during that period.

Last spring snow:

Pigeon in tree

Springtime daffodils:


Head outside and see what nature has to offer where you are!